Monday, June 27, 2011

Blast from the Past!!

Some days, I am pleasantly surprised by people. WAY back in the day, when I was in high school, a friend of mine got pregnant with a little girl. I, in my total lack of fear of the unknown, decided that I would make her a quilt. So I did, cutting out the pieces after drawing the shapes onto a fabric by tracing around cardboard templates. I hand-pieced and hand-quilted this crib sized quilt, just following an old black and white instructional book I'd checked out from the library.

Today, Candi posted a photo of the quilt to Facebook! Apparently, all three of her children have used this little quilt. I'm totally amazed! I never thought anyone would save one of the quilts I made for this long! I mean, this little thing is almost as old as I was when I made it. Seriously, I kind of choked up to see this quilt, the start of my journey into this obsession.

Saturday, June 25, 2011

Holy Pieces, Batman!

I finally finished cutting my Double Wedding Ring pieces!! Unfortunately, my GO! DWR die set started to warp, like my first die set. Worse, I am now out of Amazon's return window to get them replaced again. This irks me, because the DWR die set is regularly $90. I don't really want to re-buy it, because I got them on sale the first time around, and I'm rather of the view that something that costs almost $100 should last quite a bit longer.

I will admit that I've put the die set through quite a bit of use. Of course I have. My DWR is going to be massive. Check out the numbers below, so that I can make this baby queen sized:

72 centers needed
161 footballs
161 EACH left and right green arc ends
161 EACH left and right orange arc ends
483 green arc centers
483 orange arc centers

That's 1843 pieces. I am CRAZY.

Post cutting, I have a ton of mindless chain piecing to do, because that's like 75% of the piecing in a DWR. After that, I can move on to adding the completed arcs to the footballs.

I have to admit, I've been bad.. I got distracted by Farmer's Wife blocks. They're so addictive! Plus, I got irritated by really aggravating paper piecing instructions, since I'm NEVER going back to piecing by templates again. Seriously. NEVER. AGAIN. (I have a mental image of myself in a Scarlett O'Hara pose, holding a fistful of fabric scraps, 'cause I'm crazy like that.)

Okay, I'm off to count footballs and to chain piece like crazy, and to also do two more Farmer's wife blocks before the new week starts tomorrow.

Farmer's Wife QAL - #004 Basket Weave and #010 Bowtie

 Farmer's Wife QAL - #004 Basket Weave
I was attempting to not re-use fabrics so early in the process of piecing the Farmer's Wife blocks, but I liked the way these three looked together in my pile of fabrics. Now, I did not use templates, nor did I paper-piece this. Why bother? Strip piecing accomplishes this block far faster than either of the two methods.
Farmer's Wife QAL - #010 Bowtie
Now, I'll be honest. I got lazy and paper-pieced this one. I didn't feel like figuring out what size the white triangles are, and I already had the paper-piecing sheet printed. This one is easily done without templates or paper-piecing.

So, two down. Two more, and I'll be caught up to Week Four of the Farmer's Wife QAL. No, I'm not piecing in order, nor am I doing what everyone else is doing. I am, however, aiming for the two per week.

Friday, June 24, 2011

Farmer's Wife QAL - #110 Wood Lily

This is by far the most sedate of the blocks I've pieced so far. I played with the idea of using a green in place of the grey, but it just didn't feel right. It's brighter in person, but I didn't feel like waiting until morning to snap a shot.

Find my paper-piecing templates here. I've arranged the sections to make for easier piecing. Having said this, this block can be painful if not done with careful planning.
The above illustration shows your initial groupings. There are lots of smaller pieces. Trim your seams on the back to the 1/4". Don't leave a lot of fabric where it's not needed. You'll have bulk where you don't want it.
Once you have your initial sections pieced, you'll want to put together the above three sections. Now, guess what? Take the paper off before you put the whole block together! There's way too much bulk if you keep the paper on. Also, pay attention to how you press your seams. This block works much easier if you nest your seams.

Tuesday, June 21, 2011

Farmer's Wife QAL - #100 Weathervane Pieced

Once again, the simplified paper-piecing templates can be found here. Four seams were eliminated to make this MUCH easier to piece.
I'm debating re-piecing this one... I'm not happy with the contrast between the paisley print and the celery tone on tone print. I'll have to take my completed blocks into the sunlight tomorrow and see if I still have the urge to 'fix' it.

Farmer's Wife QAL - #001 Attic Windows & #002 Autumn Tints


Block #001 - Attic Windows
Block #002 - Autumn Tints

I've decided to paper-piece the majority of my blocks. I'm experimenting with using Carol Doak's Foundation Paper, and am pleased with the results so far. I've tried printing about ten blocks in two different printers, with only one paper jam. It tears easily but isn't so flimsy that I'm frustrated with it.

I'm limiting my fabric choices to stash for the moment, and further limiting it to bright tone on tone prints,with rare inclusions of neutrals. I'm still in that phase where I'm waiting for paychecks from the new job to kick in, so I'm trying to not buy fabric.

As I'm going along, I'm going to work my way backwards and review some of the more complicated blocks toward the end of the sequence in the book. A lot of the paper-piecing groupings just don't make sense to me, and, since I have EQ7, I'm having to re-draw the blocks. Since I'm going through the effort anyway, I'll be making them available here and on the Flickr group. The next blocks to be worked on will be #017 and #057.

Sunday, June 19, 2011

Farmer's Wife QAL - #100 Weathervane

I got my paper-piecing templates last night, all 111. Yes, that's a lot of paper! The first one I pulled out of the box was #100, Weathervane.

The paper-piecing templates provided for this block on the Yahoogroup are so counter-intuitive as to be pointless. Seriously. DO. NOT. BOTHER. I paper-piece quite a bit, and would have put this block together in the manner that the book indicates: by piecing the central square and then adding on the pieced HSTs. The paper-piecing templates I downloaded have you piecing in strips, then futzing with Y-seams to inset four of the triangles.

URGH. WHY?

So, I went to my copy of EQ7 and redrew the block. Weathervane, as presented in The Farmer's Wife is a fancied up nine-patch, meaning it can be broken down into a 3 X 3 grid, so re-drawing it was easy. I've reset the groupings for paper-piecing to make this go together much easier. I've also set the templates page and rotary cutting instruction into PDFs for easy use.

PAPER-PIECING -This file maintains the original seams as the book.
ROTARY CUTTING -This file maintains the original seams as the book.
TEMPLATES -- This file maintains the original seams as the book.

I'll be back later to post my completed block.


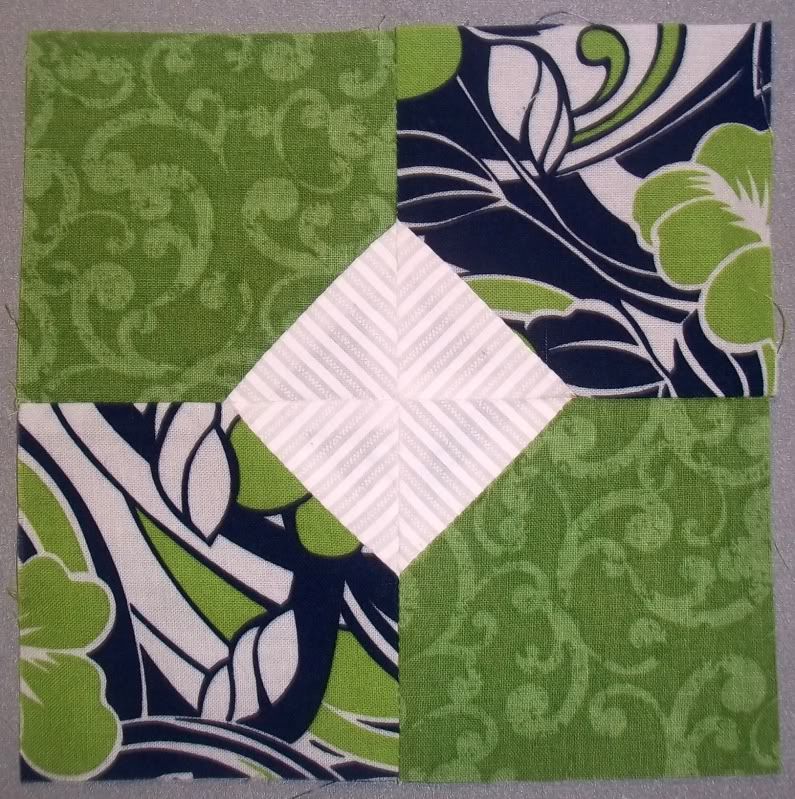
Okay. So I attempted to piece Weathervane keeping all of the original seams in place. Now I'm asking myself just why in blazes anyone would WANT to preserve all of that unnecessary piecing! There was so much bulk in places that my sewing machine balked. *sighs* Back to the drawing board, luckily for those of you who haven't come across this block yet.

My solution is as presented at left.

Download the updated file here.

I'll leave the other up, in case people really, really want to go through all those extra piecing steps...

I'm going to continue going through the harder blocks in The Farmer's Wife and post my updated paper-piecing foundations here and on the Flickr group.

Saturday, June 18, 2011

Friday Night Sew-in - What I Did

I actually managed to do some sewing for this FNS! Amazing, right?!

Tonight was all about chain piecing - I need a frightening number of subunits for my Double Wedding Ring project - 161 of each color arc. That's what I did for quite a while...

So, what I have right now are 95 green arcs (need 66 more) and 34 orange arcs (need 100 more and lots more pieces!). I have to count out the number of centers and footballs to make sure I have the right numbers - I bought extra Kona Berry in case I needed it.

While I was at work yesterday, I decided that I had to participate in the Farmer's Wife Quilt-Along, so I sent the 111 page document of paper-piecing templates to my local OfficeMax to print this evening. I've also decided that I essentially have to start over on my Dear Jane blocks - the six or so that I completed have been scattered all over the apartment and are looking pretty sad. Rather than wash them and pray, I'm just going to start fresh and newly ambitious.

I know... I must be insane. TWO sampler quilt projects, a DWR, the tutorial series...  I also made a pact with Sandi that we're going to each enter the local quilt show in May of 2010 2011, so I want to get start quilting the top I've decided will be my entry.

Anyway, I'm rambling. Time for to get started cutting fabrics again. Progress to be made yet today!

Friday, June 17, 2011

Friday Night Sew-in

It's Friday Night Sew-In! Come join in the fun and sign up here. Then, tomorrow, post about what you've done tonight.

Handmade by Heidi
I know what I'm working on. Do you?

Thursday, June 16, 2011

Creativity Abounds Once Again...

I started a new job on June 6. I can't begin to tell you how much my stress levels have changed! My creativity has been re-sparked. It feels amazing!

I spend a total of an hour commuting to and from work now, so I've decided to start a hand-piecing project: hexagons. I'm using the June Tailor simple shapes Teflon hexagons because they're reusable and fit the hexagon die cutter for my GO!

I've finally made progress on my Double Wedding Ring. If you were participating, or planning to, I apologize for my lack of posting in regards to it. I've cut about 90% of the pieces I need and started piecing. I should be able to post a piecing tutorial for DWRs before the weekend is out.

I'm also looking forward to starting in on my Dear Jane blocks again, and I'm really tempted to join the Farmer's Wife quilt-along that's started.

It feels amazing to be so creative again!

Tuesday, June 14, 2011

PM/GC Skill Builders Series - Fifty-Four Forty or Fight

Fifty-Four Forty or Fight was one of the first blocks I ever pieced... I made a small doll-sized quilt out of scraps, alternating 54-40 with another block, Variable Star:


Together, they made an interesting secondary pattern when one stepped back and looked at the overall quilt top. I was very pleased with the efforts of my second quilt. Sadly, I have no photos of this early effort of mine...


Anyway, let's move on from the personal history lesson and go to a small history lesson. 54-40 or Fight actually takes its name from the conflict over the border between what is now Canada and the United States in the Oregon Territory. "Fifty-four Forty or Fight!" was actually a political slogan of the time. 
                                                                                                                                                                   
Of course, now you're all wondering just how we're supposed to piece this lovely block? Well, a fair bit of this block is all strip piecing because five of the nine sub-units are four patches. The other four are 60° triangles in squares. We've already covered strip-piecing here, so you'll see some repetition here. New to us are the 60° triangles. 


There's three ways of doing the 60° triangles: templates, paper-piecing, or specialty rulers. www.quilterscache.com provides excellent instructions for preparing templates for the shapes needed here, so I won't repeat them. We're covering paper-piecing in a later tutorial. However, I don't feel that it's necessary to go though the effort of creating paper-piecing templates for such a basic shape. This is probably the one and only time I'll tell you that specialty rulers are probably the way to go. In particular, the Tri-Recs Tools rulers. You get rulers to make 60° triangles in squares up to 6" finished. They're also only $9.99 regularly, so they're quite cheap for specialty rulers. I bought mine when quilting notions went 50% off at Joann's.


Let's start off with our four patch units. Our final block will be 9" finished, so each subunit will finish at 3". That means that the strips of Fabrics A and B should each be 2" wide and 20" long. Sew together, press seams as desired, and slice into ten 2" segments. Sew into the required four patch subunits, making sure that your colors are alternating correctly, and press as desired once again. Set these subunits aside for the moment. I failed to take photos of each step of the strip/chain piecing portion of this. My apologies.

Now we're going to tackle the 60° triangles in squares. They're not as scary as they look, especially with a good ruler in hand! There is some bias piecing, but you can assert some control here by pinning, but I'm getting ahead of myself. 

As stated before, each subunit will finish at 3". You'll need one 3 1/2" by 12" strip of Fabric B and one 3 1/2" by 12" strip of Fabric C - and that's leaving extra fabric. I've used four different fabrics in this block for this tutorial - you can do the same or use just the traditional three.
Take your 3 1/2" by 12" strip of Fabric B, and this is where you'll begin seeing how nice these rulers are... Your finished subunit needs to be 3", which is why both strips are 3 1/2". So, all you have to do is line up your ruler on the 3 1/2" line and start cutting, flipping the ruler 180° to maximize your strip. You need four of the above shape.
Repeat the process with your Fabric C and the other ruler. You need eight of this shape. If you're using a print for this shape, you'd have to flip the ruler over to create reverse image pieces, then you'd need four of each side. Pay careful attention that you trim that little angle at the narrow tip of the triangle indicated by the ruler. You'll see why in just a moment.
Now, go ahead and line your first piece up as shown in the photo above and to the right. That little angle I told you to make sure to trim? That shows you exactly where the two pieces should line up together. The rulers have the 1/4" seams built into them, so all you have to do is follow your sewing foot or other marker. Pin if you like, but I didn't. Now, sew your first 'wing' on, press as desired, and sew on the next wing. Again, press as desired. Repeat for the other three 60° triangles in squares subunits.
Line up your pieces as pictured above - I like to do this because I will *so* put something on backwards or turned the wrong way around. Chain piece and press as desired and end up with:
One more block for our ongoing series! I've been doing them all in a coordinated scrappy look. Here's what I have so far: