Showing posts with label DWR. Show all posts

Friday, July 22, 2011

DWR Construction Instructions

I finally sat down to take photos of piecing a Double Wedding Ring. I skipped the mind-numbing chain-piecing portion of the sequence. Why? 1843 individual pieces, that's why. I buckled down, and forced myself to piece the arcs before allowing myself to start piecing rings.

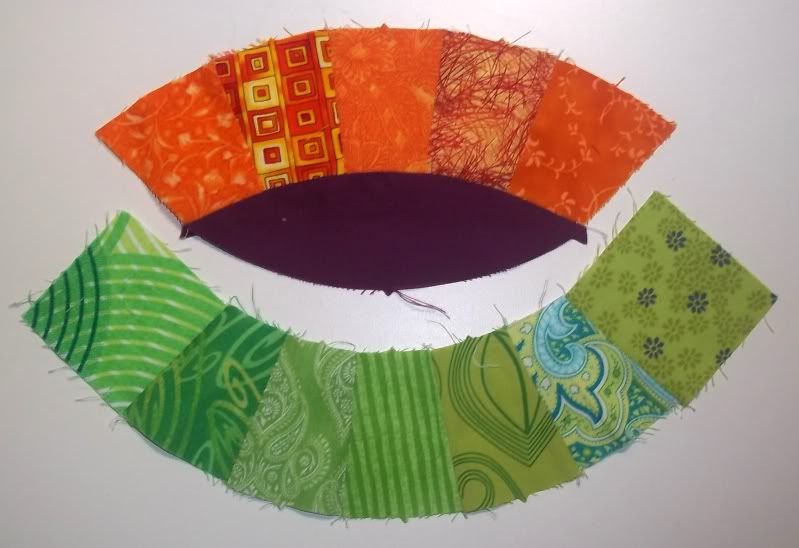
The photos will, hopefully, guide you through the process without too much confusion.  You'll go from:
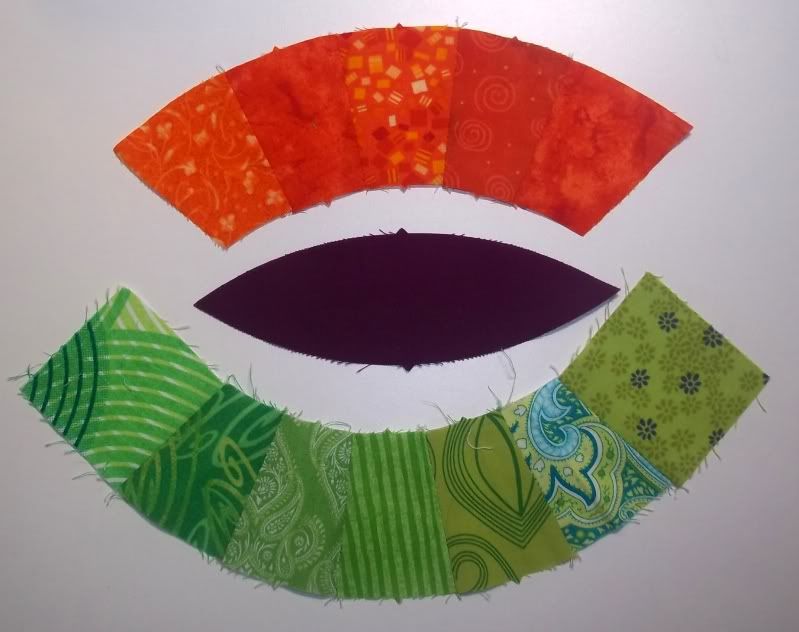
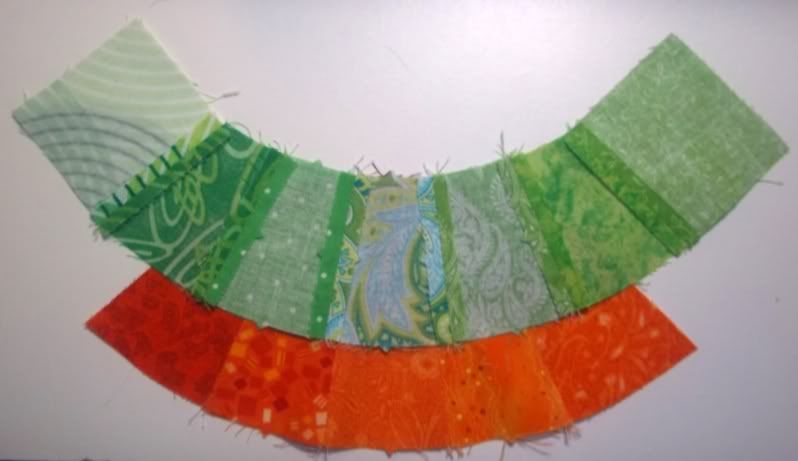
to
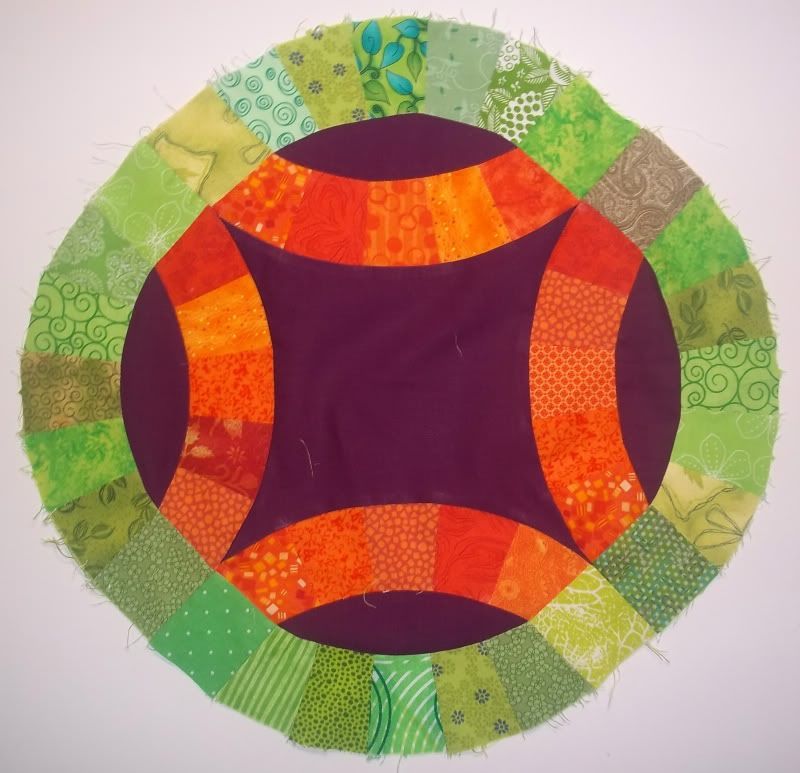
Look at the top photo - with the green arc, I've already attached the the patches that complete the football when sewn on. There's no reason to do a Y-seam here, with some planning ahead.

I always attach the short arc to the melon first. Find the mid-line of both your melon and, in this case, the orange arc. With GO! cut pieces, it's very easy. There are notches to mark those points. If you cut your pieces out from templates, you likely won't have those. I would fold each segment in half and press the fold to create a marker for yourself. Alternatively, you can draw the mid-line or eyeball it.

Once you've found your center, align your pieces like so:
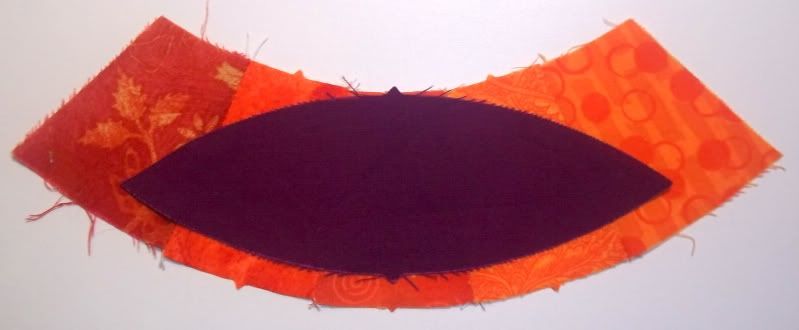
Put a pin through both pieces, vertically, along the mid-line. Then, you'll want to pin each end of the melon onto the arc segment. Having said this, the tip of the of melon should protrude past the end of the arc segment by 1/4":
Yup, that's the seam allowance! Pin that point, and repeat with the opposite tip of the melon. Now, pin the snot of that sucker:
I actually prepare about a half dozen of these and feed them through in a chain. Yes, that does make about 90% (or more) of DWRs chain-piecing, but it seems to go quicker via chain-piecing. Sew your 1/4" seam along the pinned edge. I tend to sew right over the pins, removing them only if they promise to be right under my needle as it comes down. Do what makes you feel most comfortable as you sew this seam. Press as desired. I press this seam open myself.

You'll have this now:
Line up the mid-lines of your long arc and the partially completed melon:
Again, pin vertically at that mid-line. Line up your ends and pin those. You will still see the tip of the melon poke past the edge of your fabric:
I failed to take a picture of these segments pinned together, but it works the same way the other side did. Just match your edges and ease the fullness of the larger arc along the curve.
Isn't that pretty? And pretty gratifying too, if it's laying flat and not wavy, bunchy or full of puckers. But wait! There's more.

Take your center and align you the complete football with the center's midline. You MAY mark the point where the two 1/4" seams intersect at the 'ears' of the center. I don't.
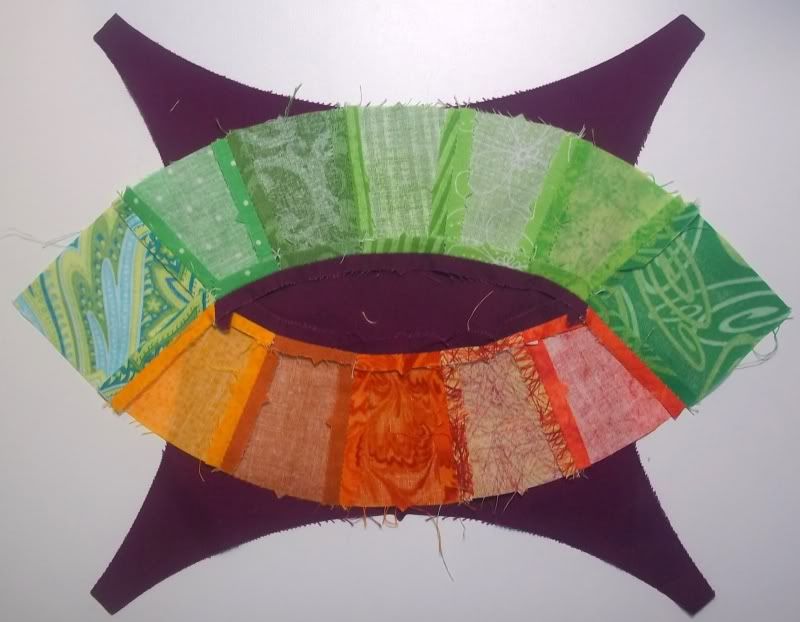
Notice that the melon almost extends to the other side... I cannot tell you if other DWR templates/paper-piecing options do the same. It's entirely possible. Pin the midline and line up the top two 'ears' of the center with the seam of the green arc WITHOUT the 'corner' patches that complete the football. Pin those, align your edges, then pin the rest, again easing the fullness. 

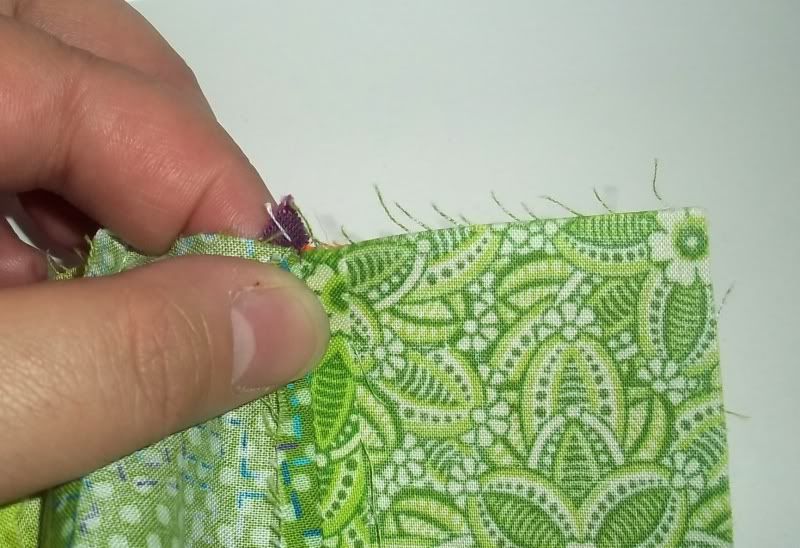
Sew your seam. This seam I start and stop with some backstitching. Again, I tend to run right over the pins, unless my needle threatens to bend or break them. Unpin before moving on. Your seam at the 'ear' should look something like:
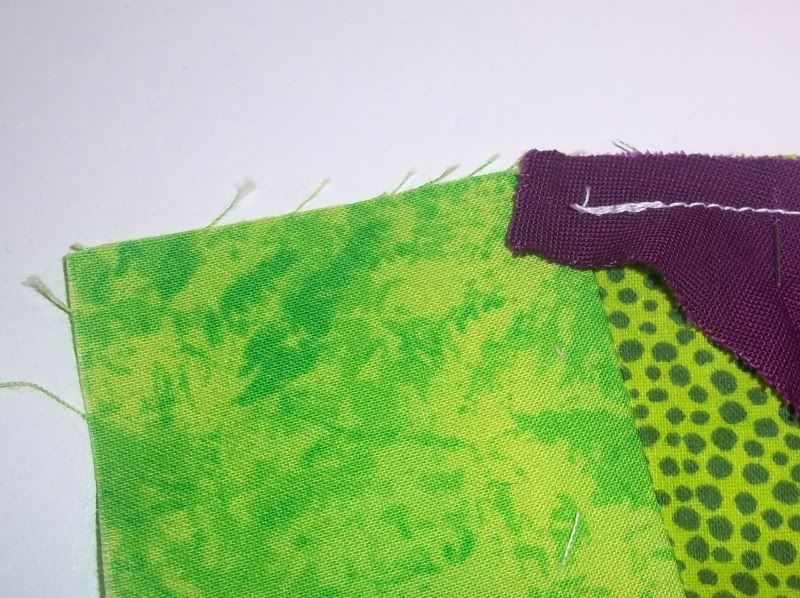
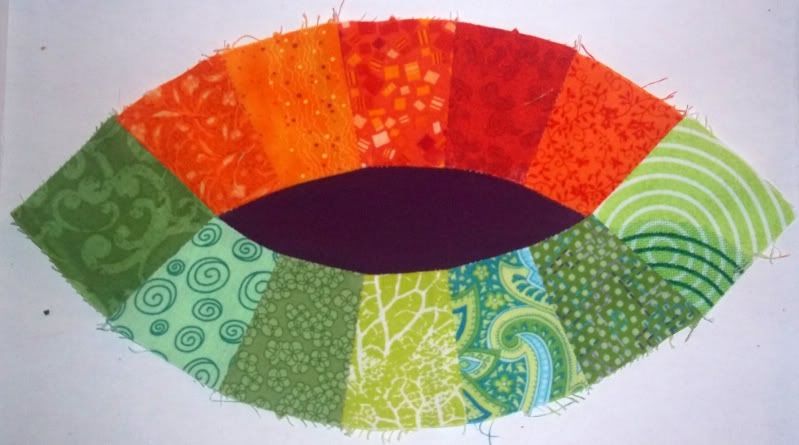
Repeat the above steps for attaching a completed melon to the opposite side.You should end up with something resembling an apple core shape. I press at this point, because I like things flat. It's probably not necessary to, but I can't swear to it. I will point out that I do not bother pressing open at this point.
One you've got your apple core, find the vertical mid-line of the apple core laying on it's side, as shown above. Match up this center with another completed melon:
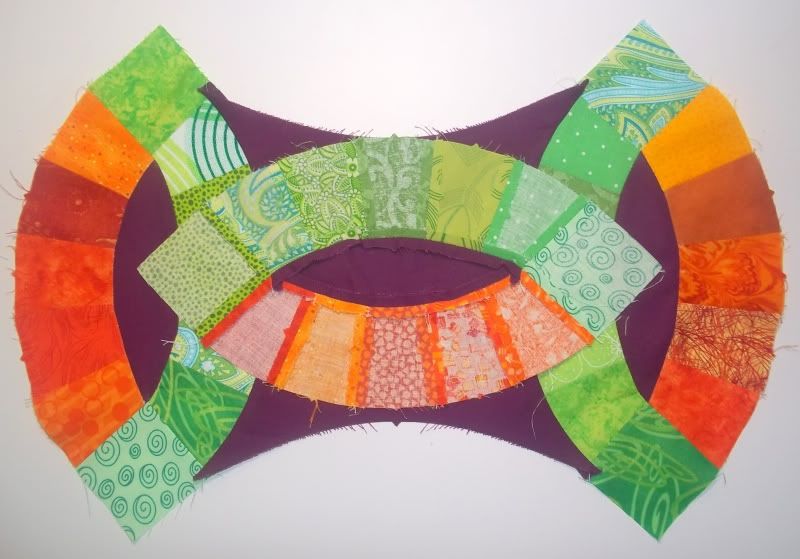
Pin that mid-line and then match your ends. Pins those and then line up fabric edges, ease fullness and pin the snot out of these two pieces. Now, when you do this, you want to locate the tip of each 'ear' and give them a little tug so that it's not folded over on itself and the 1/4" seam is where it belongs.
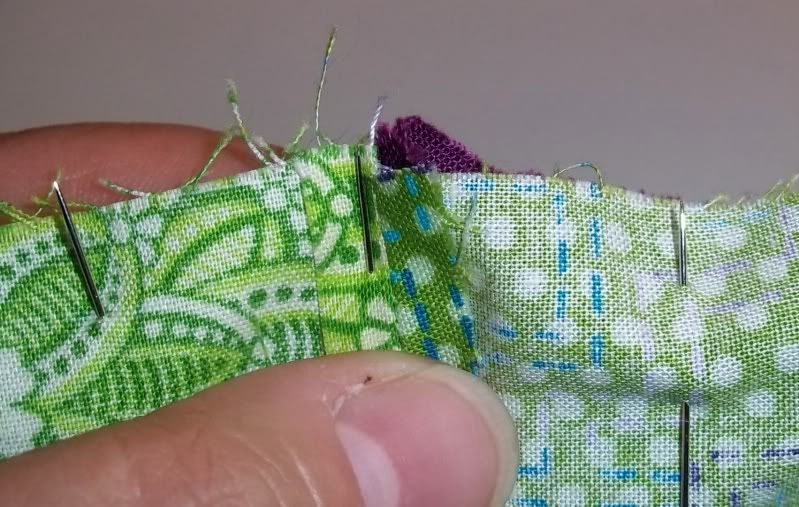
Sew your 1/4" seam. You'll have to be careful that the center fabric doesn't fold in on itself and insinuate itself between pins. Otherwise, you'll have to go back and rip those stitches out, to free the center. Repeat these last couple of steps with the other side. You should end up with a near circle:
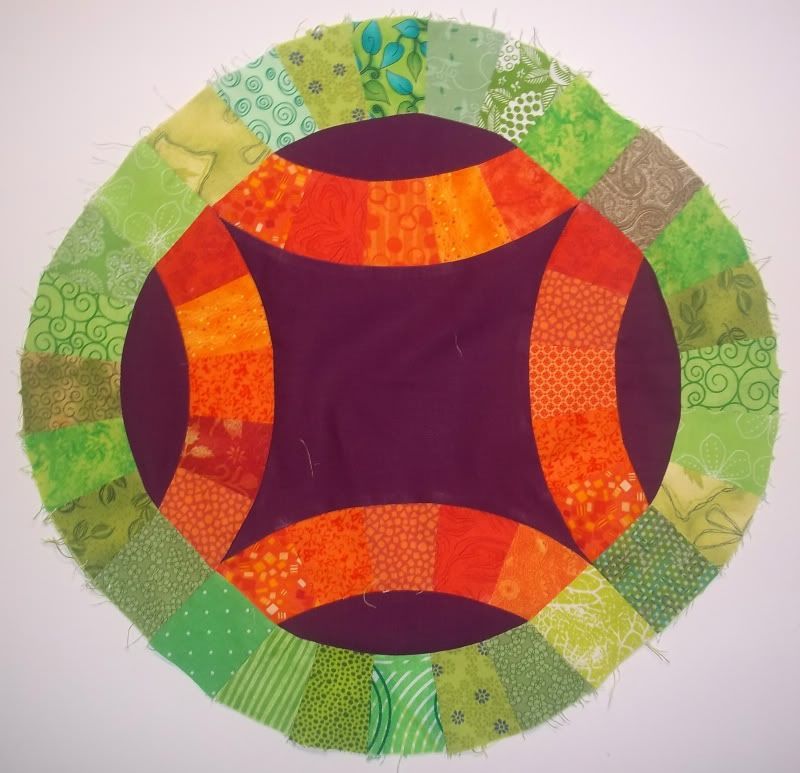
That's it! You've completed your first Double Wedding Ring! Now all you have to do is make enough 3/4 DWR to add on to make a complete row:
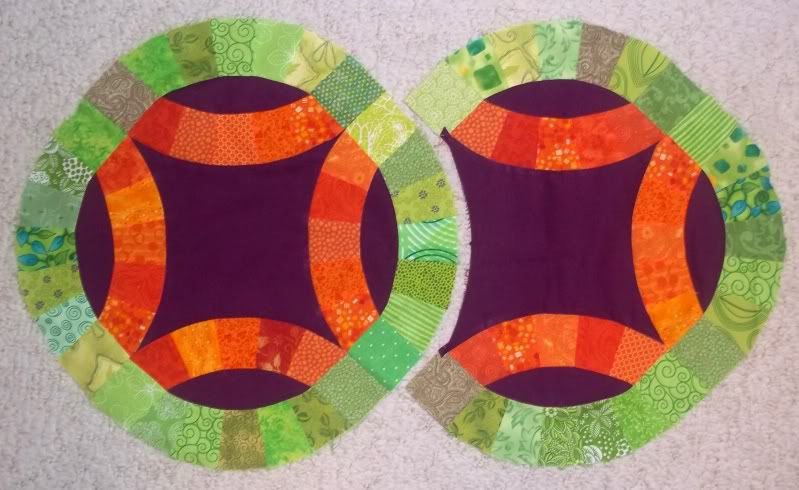
When I have enough 3/4 DWR to do a couple of rows, I'll you how to stitch the full DWR to the 3/4 DWR to complete rows. From there, I'll show you how to put the rows together.

Saturday, June 25, 2011

Holy Pieces, Batman!

I finally finished cutting my Double Wedding Ring pieces!! Unfortunately, my GO! DWR die set started to warp, like my first die set. Worse, I am now out of Amazon's return window to get them replaced again. This irks me, because the DWR die set is regularly $90. I don't really want to re-buy it, because I got them on sale the first time around, and I'm rather of the view that something that costs almost $100 should last quite a bit longer.

I will admit that I've put the die set through quite a bit of use. Of course I have. My DWR is going to be massive. Check out the numbers below, so that I can make this baby queen sized:

72 centers needed
161 footballs
161 EACH left and right green arc ends
161 EACH left and right orange arc ends
483 green arc centers
483 orange arc centers

That's 1843 pieces. I am CRAZY.

Post cutting, I have a ton of mindless chain piecing to do, because that's like 75% of the piecing in a DWR. After that, I can move on to adding the completed arcs to the footballs.

I have to admit, I've been bad.. I got distracted by Farmer's Wife blocks. They're so addictive! Plus, I got irritated by really aggravating paper piecing instructions, since I'm NEVER going back to piecing by templates again. Seriously. NEVER. AGAIN. (I have a mental image of myself in a Scarlett O'Hara pose, holding a fistful of fabric scraps, 'cause I'm crazy like that.)

Okay, I'm off to count footballs and to chain piece like crazy, and to also do two more Farmer's wife blocks before the new week starts tomorrow.

Saturday, June 18, 2011

Friday Night Sew-in - What I Did

I actually managed to do some sewing for this FNS! Amazing, right?!

Tonight was all about chain piecing - I need a frightening number of subunits for my Double Wedding Ring project - 161 of each color arc. That's what I did for quite a while...

So, what I have right now are 95 green arcs (need 66 more) and 34 orange arcs (need 100 more and lots more pieces!). I have to count out the number of centers and footballs to make sure I have the right numbers - I bought extra Kona Berry in case I needed it.

While I was at work yesterday, I decided that I had to participate in the Farmer's Wife Quilt-Along, so I sent the 111 page document of paper-piecing templates to my local OfficeMax to print this evening. I've also decided that I essentially have to start over on my Dear Jane blocks - the six or so that I completed have been scattered all over the apartment and are looking pretty sad. Rather than wash them and pray, I'm just going to start fresh and newly ambitious.

I know... I must be insane. TWO sampler quilt projects, a DWR, the tutorial series...  I also made a pact with Sandi that we're going to each enter the local quilt show in May of 2010 2011, so I want to get start quilting the top I've decided will be my entry.

Anyway, I'm rambling. Time for to get started cutting fabrics again. Progress to be made yet today!

Tuesday, April 12, 2011

DWR Quilt-Along - Let's Talk About Fabrics

It's been brought to my attention that McCall's has a free Double Wedding Ring paper piecing pattern available at their site.  Freespirit Fabrics also offers a free download here.  A big thank you to Tiffany for leading me to the McCall's pattern!  So, there are two more options for those of you want to participate.

Let's talk about fabrics!  Obviously, your biggest investment is going to be in the background fabric, should you opt to go with a single background fabric.  Check out Sandi's post, here, for some wonderful examples of a DWR drawn in EQ7 using multiple background fabrics for the melons (or footballs) and centers.  Now, just so we're clear...

THERE ARE NO WRONG CHOICES IN THIS QUILT ALONG!

Every coloring option is equally valid, whether you choose to go with a traditional palette and use off-white muslin for your centers and melons and feedsack reproductions for your arc centers and ends, or if you opt for a solid that coordinates with a favorite designer line.

Monochrome (also known as analogous), scrappy, or limited palette, is it all up to you.  I encourage you to share your choices on the Grey Cat Quilts Projects flicker group.  I would love to see them, and I would love to feature some of them here on the blog.  Posting your photos to the flickr group will not automatically grant me permission to re-post your photos here.  I will contact you and ask you for permission before posting.

I would like to start piecing next weekend, but don't worry!  There will be plenty of time for anyone to join in at any point.  I still have to buy fabrics - again.

Remember this?
Not the plan anymore.  I got silly, and drew this up in EQ7:
Yeah.  Now I need more fabric.  *facepalm*

Sunday, April 3, 2011

IT BEGINS!!!

Welcome to the Double Wedding Ring Quilt Along!  Are we ready to rumble?  No?

That's okay, so long as you're ready to tackle my favorite classic quilt pattern.  No, I am decidedly not ashamed to admit this.  I made my first DWR completely by hand, piecing and quilting.  I started it just hours before I met the man that I married.  It's his favorite quilt, and he says that he just feels loved when he's wrapped up in it.  Alas, that first DWR is showing its age  (we've been together for going on nine years now), and desperately needs to be retired so that I can continue to look at it and enjoy the memories it calls up.

That's actually what's prompted this particular Quilt Along - I need a new DWR, and I do much better with actually producing something when there's a deadline.  Imagine that!

Just some additional information and disclaimers:


I am going to do my best to make this as painless as possible.  However, this is the first quilt along I've hosted.  


I'm going to assume that all of us doing this DWR Quilt Along are familiar with the necessity for accurate cutting and a consistent 1/4" seam.  All of the products and piecing methods showcased here rely on a 1/4" seam.  

I struggled with the idea of providing yardages versus total number of pieces, or attempting to include both.  Why was this such an issue?  Because, traditionally, a Double Wedding Ring is pieced from scraps, with a single background fabric.  However, many of us are attracted to a more minimalist color scheme.  So, what I'm going to do, is provide a total number of pieces needed, for each shape, and then the overall yardage for that shape.  I leave it to you to decide if you will do a single background color, as well as how many different fabrics you will use in the arcs of the rings.  It should be a simple matter of division, with possibly a little extra yardage thrown in for oopsies, to figure out how much each fabric you select you will need.  


For any assistance, you may contact me via comment or e-mailing me directly (please ensure to put DWR Quilt Along in the subject line), or utilize the Gray Cat Quilts Projects flickr group.  Using the flickr group might mean that someone will have an answer for you before I get to my computer.  


Now, let's move on to the interesting part of things!  The anatomy of a DWR block, so that you all know what I'm referring to in future posts:
Those of you who have an Accuquilt GO!, you've got it easy.  Your supply list is as follows:

Accuquilt GO!
GO! Double Wedding Ring die set (55078)
10" square GO! cutting mat (55111)
sewing machine
scissors or thread snips
thread (use what you're comfortable with, both for piecing and quilting)
sewing machine needles (some for piecing, some for quilting)

Now, I'll be honest - I had a chance to play with my DWR die set yet, so I'm not sure what the finished size of a block is using it.  I guess-timate (so scientific, I know!) a top size of about 62" square, based on knowing that the die set uses the 10" X 10" cutting mat.  However, I did figure out exactly how many pieces would be needed for that size top.  The yardage given includes

If you would like to make a larger (or smaller) version, please refer to the GO! Fabric Reference Chart, available as a PDF download here.

Piece Name     Qty. Needed     Total Yardage
Arc Centers            504                  5 1/8
Arc Ends                336                  3 1/4
Corners                  168                  1 1/2
Melons                    84                   1 3/4
Centers                    36                     3    

For those of you who do not, I am providing EQ7 templates for you to print and use, as well as a supply list for that.  However, I highly recommend obtaining a template set for accuracy's sake, not to mention making this project much less time consuming and irritating.  The voice of experience is talking here - that first DWR?

Yeah, I made that by tracing around all of the templates that I made from heavy weight plastic and then cutting all of the pieces out with scissors.  Definitely not fun.

I digress...

Those of you using pre-made acrylic templates, like Marti Michell or Omnigrid's Double Wedding Templates, your supply list is as follows:

your acrylic templates of choice
sewing machine
scissors or thread snips
thread (use what you're comfortable with, both for piecing and quilting)
sewing machine needles (some for piecing, some for quilting)
rotary cutter (I recommend a smaller one, like 28 mm)
rotary cutting mat

For your yardage, and required number of pieces, I refer you to your instruction booklets.  Both the Marti Michell and Omnigrid booklets list several different sizes and the numbers of pieces and yardage for each size.  

For those of you needing the EQ7 templates, and yardages - I have to apologize at this moment.  I don't have my printer hooked up, and apparently the program requires that to print templates.  Plus, I just realized at this moment that I should have been quite a bit smarter about how I set up a DWR in EQ7 in order to get yardages.  As soon as I can get a fresh look at this in the morning, I will correct this oversight.  Again, my apologies - I didn't forget about you - I got tired and stupid. 

On this note, I'm going to have my very belated dinner, and head to bed.  The blog button for this quilt along can be found in my side bar.  Thank you so much for you patience.  I'm gonna go crash.


Edit 4/3/2011 -

Okay, the supply list for those of you working from the EQ7 templates, which will have to wait until tomorrow.  I have no ink in my printer :P


sewing machine
scissors
thread (use what you're comfortable with, both for piecing and quilting)
sewing machine needles (some for piecing, some for quilting)
template plastic
fabric marker for tracing the shapes out onto fabric (I personally prefer the Sewline Mechanical Pencil)

Yardages for a quilt top finishing at 68" X 68":

Piece Name     Qty. Needed     Total Yardage
Arc Centers           1792                4 1/4
Corners                  448                   5/8
Melons                   224                  2 1/4
Centers                    49                     3   

Now, as you can see from the total number of pieces, there's a reason I highly recommend pre-made acrylic templates.  

As soon as I get a break tomorrow (I'm working open to close, but most of it at the mall), I will take care of getting the templates uploaded and available on this post.

Wednesday, March 30, 2011

Another DWR Teaser

This is what I'm thinking of doing, but I'm so tempted to throw the towel in on this color palette and go with the black background with pink and aqua circles.  This just doesn't have the same visual pop for me... Hmm...  What if I go with purple and yellow?


Now, I'm sure you've all noticed that I'm working these samples up in fairly limited color palettes.  Why?  Because I get really, really bored dropping different colors into EQ7.  I'm not kidding, lol.  I love the program, but I spend 90% of my day working on the computer, so I tend to try to transition from work to my sewing machine with as little computer time as possible.

Also, I like the look of the limited color palettes.  For me, it does a lot to modernize this classic quilt pattern.  And, honestly, I've done a scrappy DWR, so I'm not eager to re-tread creative ground:

Obligatory Cat Cleaning Herself Included
But don't let my current color freakiness off put you to a scrappy look.  Take a look at the following mosaic for some further color inspiration:

DWR_Mosaic


Check back on Saturday, 4/2/2001.  I'll be posting fabric requirements and a recommended supply list for the quilt along.  I'll also have a blog button up if you'd like to advertise your involvement in your own side bar.

Wednesday, March 23, 2011

EQ 7 is Crack....

So here's a Double Wedding Ring teaser:


I love the way the colors scream out of this one.  If I wasn't so sure I wanted to use grey for the Double Wedding Ring Quilt Along, I'd switch gears right now.  (Besides, I already bought the fabric...)

Thursday, March 17, 2011

Who's Ready for a Quilt Along?

Things are finally quieting down on my end - Super Bowl Mania is over (I'm deep in Packer Country), so work is a lot less hectic.  My mother-in-law is back from her vacation in California, so Zeb is thrilled to be spending time with Grandma again.

Plus, I got the Double Wedding die set for my GO!  I'm excited to play with that tonight.  And for those of you with GO! cutters - check out amazon.com for dies.  I got my DWR for 41% off the retail price of $89.99.  I also got my Hexagon die for about the same savings.  Interestingly enough, I only ordered them two days ago - I'm close enough to the warehouse that those come out of to have gotten them in 48 hours, and to have not paid for shipping at all.

But anyway!  The point!

The point is...

I'm going to start, in April, a Double Wedding Ring Quilt Along!  Check back here as April 2 comes closer.  I'm starting to do fabric requirements and measurements now.  I'll be doing a few sets of requirements:  one for those who are going to use GO! cutters, the Omnigrid DWR templates, as well as a set for some templates from EQ7.

My end goal is to have a queen-sized DWR top by the end of this quilt along.  Now I just have to decide on a time frame.  I know most blog quilt alongs don't drag on, but DWRs involve a lot of curves, and that's an area a lot of folks just aren't comfy in.  Don't worry!  I'll post lots of photos, and tips and tricks.  I've made two DWRs before.

What do you all think?  As far as timeline goes?  Two months? Three? Four?  Longer?  Let me know in comments!  (I tried doing a fancy schmancy poll, but it didn't load correctly)